应用层的事件分发流程看得多了,但是对事件是怎么从底层获取分发的一直不是很了解,刚好临近春节这几天没那么忙,看了下源码(android-8.0.0_r1)和一些博客,这里给大家分享下。
启动与初始化
首先framework层的设备事件获取和分发都是在InputManagerService里面进行的,它在SystemServer里面启动:
1
2
3
4
5
6
7
8
9
10
11
12
13
14
15
16
17
18
19
20
21
22
| // frameworks/base/services/java/com/android/server/SystemServer.java
public final class SystemServer {
...
public static void main(String[] args) {
new SystemServer().run();
}
...
private void run() {
...
startOtherServices();
...
}
...
private void startOtherServices() {
inputManager = new InputManagerService(context);
...
inputManager.start();
}
...
}
|
InputManagerService在构造函数里面会调用nativeInit,初始化native层相关环境,得到一个指针mPtr,这个指针其实是c++里面new出来的对象,所以在start的时候调用nativeStart将这个mPtr传回进去就能启动native层的相关逻辑
1
2
3
4
5
6
7
8
9
10
11
| // frameworks/base/services/core/java/com/android/server/input/InputManagerService.java
public InputManagerService(Context context) {
...
mPtr = nativeInit(this, mContext, mHandler.getLooper().getQueue());
...
}
...
public void start() {
nativeStart(mPtr);
...
}
|
我们接着来来看看natvie层,nativeInit的时候其实是new了一个NativeInputManager出来并且返回.这个NativeInputManager属于JNI层,作用是联通framework层的InputManagerService和native层的InputManager。所以上面的mPtr其实就是NativeInputManager的指针,而且NativeInputManager的构造函数里面又会创建InputManager,我们这次要看的事件获取和分发就主要在它内部实现:
1
2
3
4
5
6
7
8
9
10
11
12
13
14
15
16
17
18
| // frameworks/base/services/core/jni/com_android_server_input_InputManagerService.cpp
static jlong nativeInit(JNIEnv* env, jclass /* clazz */,
jobject serviceObj, jobject contextObj, jobject messageQueueObj) {
...
NativeInputManager* im = new NativeInputManager(contextObj, serviceObj,
messageQueue->getLooper());
im->incStrong(0);
return reinterpret_cast<jlong>(im);
}
...
NativeInputManager::NativeInputManager(jobject contextObj,
jobject serviceObj, const sp<Looper>& looper) :
mLooper(looper), mInteractive(true) {
...
sp<EventHub> eventHub = new EventHub();
mInputManager = new InputManager(eventHub, this, this);
}
|
在nativeStart的时候就会将这个InputManager启动:
1
2
3
4
5
6
7
| // frameworks/base/services/core/jni/com_android_server_input_InputManagerService.cpp
static void nativeStart(JNIEnv* env, jclass /* clazz */, jlong ptr) {
NativeInputManager* im = reinterpret_cast<NativeInputManager*>(ptr);
status_t result = im->getInputManager()->start();
...
}
|
InputManager里面会启动两条线程,分别用于事件的读取和分发:
1
2
3
4
5
6
7
8
9
10
11
12
13
14
15
16
17
18
19
20
21
22
23
24
| // frameworks/native/services/inputflinger/InputManager.cpp
InputManager::InputManager(
const sp<EventHubInterface>& eventHub,
const sp<InputReaderPolicyInterface>& readerPolicy,
const sp<InputDispatcherPolicyInterface>& dispatcherPolicy) {
mDispatcher = new InputDispatcher(dispatcherPolicy);
mReader = new InputReader(eventHub, readerPolicy, mDispatcher);
initialize();
}
void InputManager::initialize() {
mReaderThread = new InputReaderThread(mReader);
mDispatcherThread = new InputDispatcherThread(mDispatcher);
}
status_t InputManager::start() {
status_t result = mDispatcherThread->run("InputDispatcher", PRIORITY_URGENT_DISPLAY);
...
result = mReaderThread->run("InputReader", PRIORITY_URGENT_DISPLAY);
...
return OK;
}
|
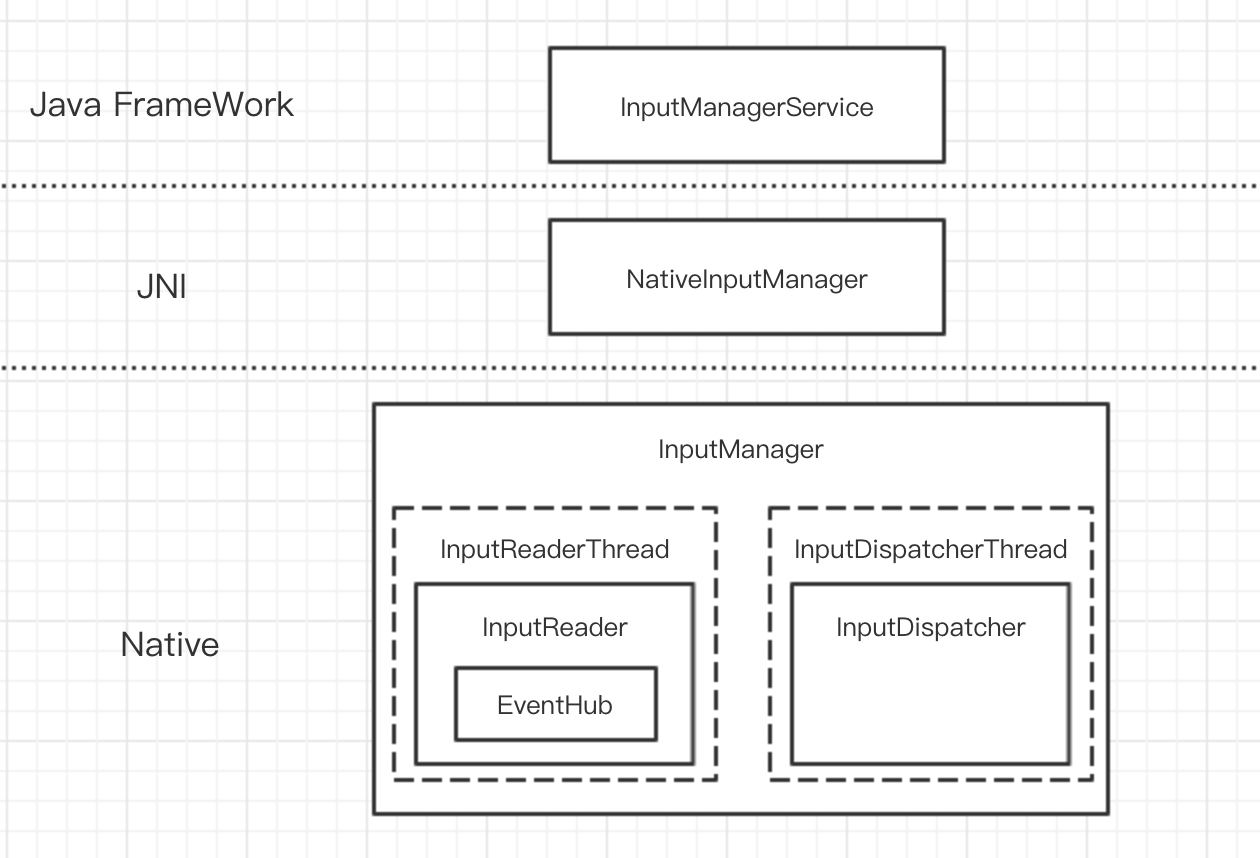
通过上面的启动流程,我们可以整理出相关模块的层次关系如下:
启动的时序图如下:

今天这篇文章主要讲的就是Native层的事件获取流程,几个相关模块的功能如下:
- EventHub : 从底层设备驱动读取事件消息
- InputReader : 从EventHub读取事件消息发送给InputDispatcher
- InputDispatcher : 接收来自的InputReader的实现消息并分发到应用层
事件读取
Thread
到了这里其实整个启动就完成了,在继续讲InputManager是怎么读取事件之前我觉得有必要先看看Thread是怎么工作的。
Thread::run方法会调用createThreadEtc,这个方法的第一个参数是一个函数指针。
createThreadEtc会去启动一个线程去调用这个传进去的函数。
这里我们看到传进去的是_threadLoop方法,所以_threadLoop方法会在子线程中执行:
1
2
3
4
5
6
7
8
| // system/core/libutils/Threads.cpp
status_t Thread::run(const char* name, int32_t priority, size_t stack)
{
...
res = createThreadEtc(_threadLoop,
this, name, priority, stack, &mThread);
...
}
|
_threadLoop是Thread的一个静态成员函数,它传入的参数是createThreadEtc的第二个参数,即Thread的this指针,所以可以在这里把它转回Thread*,之后就在一个while循环里面不断的执行Thread::threadLoop方法:
1
2
3
4
5
6
7
8
9
10
11
12
13
14
15
16
17
18
19
20
21
22
|
// system/core/libutils/Threads.cpp
int Thread::_threadLoop(void* user)
{
	Thread* const self = static_cast<Thread*>(user);

	sp<Thread> strong(self->mHoldSelf);
	...

	do {
		...
		result = self->threadLoop();
		...
		if (result == false || self->mExitPending) {
			...
			break;
		}
		...
	} while(strong != 0);

	return 0;
}
|
而threadLoop是一个纯虚函数,就相当于java里面的抽象方法,由子类去实现
1
2
3
4
5
6
7
| // system/core/libutils/include/utils/Thread.h
class Thread : virtual public RefBase
{
..
virtual bool threadLoop() = 0;
...
}
|
ok,我们来看看InputDispatcherThread是怎么实现它的:
1
2
3
4
5
6
7
8
9
10
11
12
13
14
15
16
17
18
19
20
21
22
| // frameworks/native/services/inputflinger/InputDispatcher.cpp
bool InputDispatcherThread::threadLoop() {
mDispatcher->dispatchOnce();
return true;
}
void InputDispatcher::dispatchOnce() {
nsecs_t nextWakeupTime = LONG_LONG_MAX;
...
if (!haveCommandsLocked()) {
dispatchOnceInnerLocked(&nextWakeupTime);
}
...
if (runCommandsLockedInterruptible()) {
nextWakeupTime = LONG_LONG_MIN;
}
...
nsecs_t currentTime = now();
int timeoutMillis = toMillisecondTimeoutDelay(currentTime, nextWakeupTime);
mLooper->pollOnce(timeoutMillis);
}
|
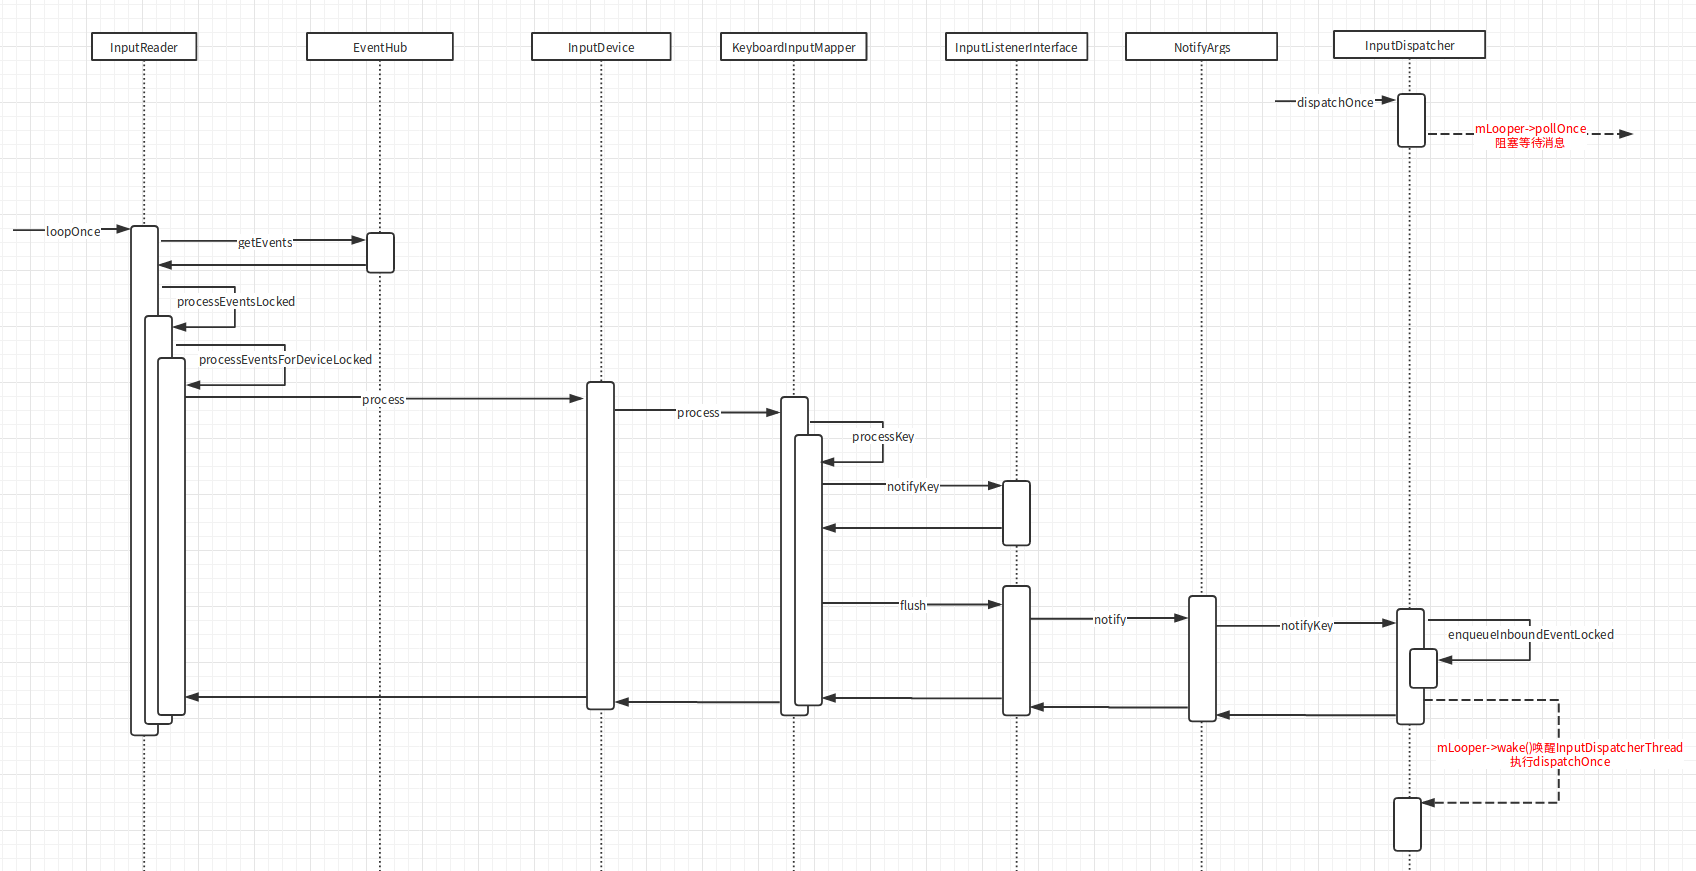
dispatchOnce去执行消息分发或者运行命令,但是因为一开始并没有读到任何的消息或者命令,所以第一次dispatchOnce并没有做什么实际的工作,于是最后跑到了mLooper::pollOnce,这个方法里面会阻塞住,等待其他线程唤醒mLooper(这块的知识以前有写过一篇深入native层死抠Handler,感兴趣的同学可以去看看)
也就是说现在InputDispatcher已经阻塞在那里等待消息的到来,再去进行分发了。而这个消息是哪里来的呢?
答案就是之前创建的另外一个线程InputReaderThread:
1
2
3
4
5
6
7
8
9
10
11
12
13
14
15
16
17
18
19
20
21
22
23
24
25
26
27
28
29
30
31
32
33
34
35
36
| // frameworks/native/services/inputflinger/InputReader.cpp
bool InputReaderThread::threadLoop() {
mReader->loopOnce();
return true;
}
void InputReader::loopOnce() {
...
size_t count = mEventHub->getEvents(timeoutMillis, mEventBuffer, EVENT_BUFFER_SIZE);
...
if (count) {
processEventsLocked(mEventBuffer, count);
}
...
mQueuedListener->flush();
}
void InputReader::processEventsLocked(const RawEvent* rawEvents, size_t count) {
for (const RawEvent* rawEvent = rawEvents; count;) {
...
int32_t deviceId = rawEvent->deviceId;
processEventsForDeviceLocked(deviceId, rawEvent, batchSize);
...
count -= batchSize;
rawEvent += batchSize;
}
}
void InputReader::processEventsForDeviceLocked(int32_t deviceId,
const RawEvent* rawEvents, size_t count) {
ssize_t deviceIndex = mDevices.indexOfKey(deviceId);
InputDevice* device = mDevices.valueAt(deviceIndex);
device->process(rawEvents, count);
}
|
在threadLoop里面会去通过mEventHub向底层驱动读取事件,然后找到事件对应的InputDevice去处理,InputDevice是在addDeviceLocked里面添加的:
1
2
3
4
5
6
7
8
9
10
11
12
13
14
15
16
17
18
19
20
21
| // frameworks/native/services/inputflinger/InputReader.cpp
void InputReader::addDeviceLocked(nsecs_t when, int32_t deviceId) {
...
InputDevice* device = createDeviceLocked(deviceId, controllerNumber, identifier, classes);
...
mDevices.add(deviceId, device);
}
InputDevice* InputReader::createDeviceLocked(int32_t deviceId, int32_t controllerNumber,
const InputDeviceIdentifier& identifier, uint32_t classes) {
InputDevice* device = new InputDevice(&mContext, deviceId, bumpGenerationLocked(),
controllerNumber, identifier, classes);
...
if (keyboardSource != 0) {
device->addMapper(new KeyboardInputMapper(device, keyboardSource, keyboardType));
}
...
return device;
}
|
createDeviceLocked里面会根据设备的类型给InputDevice添加Mapper,例如键盘设备会添加KeyboardInputMapper。
知道了InputDevice是啥,我们再来以键盘设备为例看看它的process方法里面干了什么:
1
2
3
4
5
6
7
8
9
10
11
12
13
14
15
16
17
18
19
20
21
22
23
24
25
26
27
28
29
30
31
32
33
34
35
36
37
38
39
| // frameworks/native/services/inputflinger/InputReader.cpp
void InputDevice::process(const RawEvent* rawEvents, size_t count) {
size_t numMappers = mMappers.size();
for (const RawEvent* rawEvent = rawEvents; count--; rawEvent++) {
...
for (size_t i = 0; i < numMappers; i++) {
InputMapper* mapper = mMappers[i];
mapper->process(rawEvent);
}
...
}
}
void KeyboardInputMapper::process(const RawEvent* rawEvent) {
switch (rawEvent->type) {
case EV_KEY: {
...
processKey(rawEvent->when, rawEvent->value != 0, scanCode, usageCode);
...
break;
}
...
}
}
void KeyboardInputMapper::processKey(nsecs_t when, bool down, int32_t scanCode,
int32_t usageCode) {
...
keyCode = rotateKeyCode(keyCode, mOrientation);
...
nsecs_t downTime = mDownTime;
...
NotifyKeyArgs args(when, getDeviceId(), mSource, policyFlags,
down ? AKEY_EVENT_ACTION_DOWN : AKEY_EVENT_ACTION_UP,
AKEY_EVENT_FLAG_FROM_SYSTEM, keyCode, scanCode, keyMetaState, downTime);
getListener()->notifyKey(&args);
}
|
我们看到它最终调用了KeyboardInputMapper的processKey函数,封装了一个按键事件的NotifyKeyArgs发送给一个Listener,那这个Listener是啥呢:
1
2
3
4
5
6
7
8
9
10
11
12
13
14
15
16
17
18
19
20
21
22
23
24
| // frameworks/native/services/inputflinger/InputReader.h
class InputMapper {
...
inline InputListenerInterface* getListener() { return mContext->getListener(); }
...
InputReaderContext* mContext;
...
}
...
class InputReader : public InputReaderInterface {
...
class ContextImpl : public InputReaderContext {
InputReader* mReader;
...
}
...
}
// frameworks/native/services/inputflinger/InputReader.cpp
InputListenerInterface* InputReader::ContextImpl::getListener() {
return mReader->mQueuedListener.get();
}
|
它最后get出来其实是InputReader的mQueuedListener,而这里的notifyKey方法也没有立马就将NotifyKeyArgs发送出去,它只是先保存到了一个队列里面:
1
2
3
4
5
| // frameworks/native/services/inputflinger/InputListener.cpp
void QueuedInputListener::notifyKey(const NotifyKeyArgs* args) {
mArgsQueue.push(new NotifyKeyArgs(*args));
}
|
然后有认真听讲的同学可能会记得上面InputReader::loopOnce里面最后其实是有调用它的flush方法的:
1
2
3
4
5
6
7
8
9
10
11
12
| // frameworks/native/services/inputflinger/InputReader.cpp
void InputReader::loopOnce() {
...
size_t count = mEventHub->getEvents(timeoutMillis, mEventBuffer, EVENT_BUFFER_SIZE);
...
if (count) {
processEventsLocked(mEventBuffer, count);
}
...
mQueuedListener->flush();
}
|
这个flush方法里面才是真正的发送消息给mInnerListener:
1
2
3
4
5
6
7
8
9
10
11
12
13
14
| // frameworks/native/services/inputflinger/InputListener.cpp
void QueuedInputListener::flush() {
size_t count = mArgsQueue.size();
for (size_t i = 0; i < count; i++) {
NotifyArgs* args = mArgsQueue[i];
args->notify(mInnerListener);
delete args;
}
mArgsQueue.clear();
}
void NotifyKeyArgs::notify(const sp<InputListenerInterface>& listener) const {
listener->notifyKey(this);
}
|
这个mInnerListener又是哪里来的呢:
1
2
3
4
5
6
7
8
9
10
11
12
13
14
15
16
17
18
19
20
21
22
23
24
25
26
| // frameworks/native/services/inputflinger/InputListener.cpp
QueuedInputListener::QueuedInputListener(const sp<InputListenerInterface>& innerListener) :
mInnerListener(innerListener) {
}
// frameworks/native/services/inputflinger/InputReader.cpp
InputReader::InputReader(const sp<EventHubInterface>& eventHub,
const sp<InputReaderPolicyInterface>& policy,
const sp<InputListenerInterface>& listener) :
mContext(this), mEventHub(eventHub), mPolicy(policy),
mGlobalMetaState(0), mGeneration(1),
mDisableVirtualKeysTimeout(LLONG_MIN), mNextTimeout(LLONG_MAX),
mConfigurationChangesToRefresh(0) {
mQueuedListener = new QueuedInputListener(listener);
...
}
// frameworks/native/services/inputflinger/InputManager.cpp
InputManager::InputManager(
const sp<EventHubInterface>& eventHub,
const sp<InputReaderPolicyInterface>& readerPolicy,
const sp<InputDispatcherPolicyInterface>& dispatcherPolicy) {
mDispatcher = new InputDispatcher(dispatcherPolicy);
mReader = new InputReader(eventHub, readerPolicy, mDispatcher);
...
}
|
mInnerListener其实是InputDispatcher,在InputDispatcher::notifyKey里面会将NotifyKeyArgs封装成KeyEntry丢到mInboundQueue.isEmpty中,然后唤醒InputDispatcher::dispatchOnce里面阻塞住的mLooper:
1
2
3
4
5
6
7
8
9
10
11
12
13
14
15
16
17
18
19
20
21
22
23
| // frameworks/native/services/inputflinger/InputDispatcher.cpp
void InputDispatcher::notifyKey(const NotifyKeyArgs* args) {
...
int32_t repeatCount = 0;
KeyEntry* newEntry = new KeyEntry(args->eventTime,
args->deviceId, args->source, policyFlags,
args->action, flags, keyCode, args->scanCode,
metaState, repeatCount, args->downTime);
needWake = enqueueInboundEventLocked(newEntry);
...
if (needWake) {
mLooper->wake();
}
}
bool InputDispatcher::enqueueInboundEventLocked(EventEntry* entry) {
bool needWake = mInboundQueue.isEmpty();
mInboundQueue.enqueueAtTail(entry);
...
return needWake;
}
|
于是dispatchOnce继续执行重新被子线程调用,接下来就是从mInboundQueue里面拿出消息去分发了。分发这一块的逻辑也比较复杂我们放到下一篇继续讲。
事件读取的时序图如下:
EventHub
上面讲的事件获取流程大概是这样的,loopOnce不断被死循环调用通过mEventHub获取事件放到mQueuedListener,里面,然后再通过mQueuedListener::flush,方法唤醒InputDispatcher去分发事件:
1
2
3
4
5
6
7
8
9
10
11
12
| // frameworks/native/services/inputflinger/InputReader.cpp
void InputReader::loopOnce() {
...
size_t count = mEventHub->getEvents(timeoutMillis, mEventBuffer, EVENT_BUFFER_SIZE);
...
if (count) {
processEventsLocked(mEventBuffer, count);
}
...
mQueuedListener->flush();
}
|
但是这样是不是意味着InputReader是通过轮询去获取设备驱动的事件的?效率会不会很低?
其实不是的,EventHub::getEvents在设备没有接收到事件的时候也是阻塞的:
1
2
3
4
5
6
| // frameworks/native/services/inputflinger/EventHub.cpp
size_t EventHub::getEvents(int timeoutMillis, RawEvent* buffer, size_t bufferSize) {
...
int pollResult = epoll_wait(mEpollFd, mPendingEventItems, EPOLL_MAX_EVENTS, timeoutMillis);
...
}
|
epoll_wait是liunx的多路复用IO接口,这里会阻塞等待mEpollFd这个设备的接收到消息.
总结
所以现在整个事件的获取流程就清晰了:
- SystemServer启动InputManagerService
- InputManagerService启动NativeInputManager
- NativeInputManager启动InputManager
- InputManager启动InputReaderThread和InputDispatcherThread
- InputReaderThread调用InputReader从EventHub读取设备事件唤醒InputDispatcherThread
- InputDispatcherThread拿到实际进行分发
PS:本文参考了Stan_Z的Android Input系列文章,我也推荐大家去看看,这里面还讲了很多其他的细节